Raspberry Pi 3 — Day 2 — IR Remote
หลังจากนั่งนึกอยู่นานว่าจะเอาไปเล่นอะไรดี ที่เกี่ยวข้องกับ smart home และก็เริ่มต้นค่าอุปกรณ์ไม่แพงมาก ก็เลยเริ่มจากทำ ir remote ต่างๆเช่น tv, air ก่อนละกันนะครับ ทำอะไรบ้าง -…
หลังจากนั่งนึกอยู่นานว่าจะเอาไปเล่นอะไรดี ที่เกี่ยวข้องกับ smart home และก็เริ่มต้นค่าอุปกรณ์ไม่แพงมาก ก็เลยเริ่มจากทำ ir remote ต่างๆเช่น tv, air ก่อนละกันนะครับ
ทำอะไรบ้าง
- ต่อ Infrared Tx/Rx
- อ่านค่า ir remote มาสร้างเป็น config
- ส่งค่า ir ที่อ่านได้ไปควบคุมอุปกรณ์
สิ่งที่ต้องเตรียม
- Raspberry Pi 3
- Jumper (40 เส้น 130 บาท)
- IR receiver / transmitter (ขายรวมมาเป็นคู่ 35 บาท แต่ต้องประกอบวงจรเพิ่มเอง ถ้าซื้อแบบดีหน่อยที่มีวงจรให้แล้ว จะประมาณตัวละ 50 บาท เช่น https://www.arduinoall.com/product/932/ir-transmitter-โมดูลส่งสัญญาณอินฟาเรด)
- ฺBread board (50–200 บาท แล้วแต่ความใหญ่ ถ้าใช้ jumper f/f กับ module ir ที่ประกอบมาแล้ว ก็เสียบๆต่อขากันเลยก็ได้ ไม่ต้องใช้ bread board)
ถ้าไม่ได้ใช้ led แบบสำเร็จรูปต้อง ใช้ transistor มาช่วย ขยายสัญญาณด้วย
- 2N2222 หรือ NPN Transistor x1
- 200 Ω x 1
- 10k Ω x1
Ref http://www.raspberry-pi-geek.com/Archive/2015/10/Raspberry-Pi-IR-remote https://www.modmypi.com/blog/raspberry-pis-remotes-ir-receivers http://www.ivancreations.com/2015/04/control-air-conditioner-with.html
รับสัญญาณ IR
เริ่มต้นเราทำตัวรับกันก่อน เพื่ออ่านสัญญาณจาก remote ต่างๆ ว่าค่าที่ส่งมาเป็นอะไรบ้าง เพื่อที่เราจะได้นำไปเลียนแบบการส่งได้ในภายหลัง
เริ่มต้นด้วยการปิด pi จากนั้นติดตั้ง ir receiver ลงไปก่อน
http://awesomepi.com/part-1-using-every-ir-remote-with-raspberry-pi-2-with-this-cheap-and-easy-solution/ http://awesomepi.com/wp-content/uploads/2015/12/raspberry_pi_lirc_ir_receiver_tsop4838.png
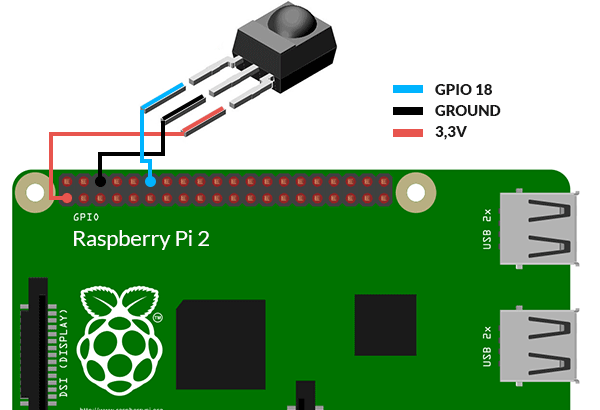
จากนั้นทำการเปิด pi และเข้าสู่ระบบ และอัพเกรดก่อนเพื่อให้ได้ เวอร์ชัน
$ sudo apt-get update
$ sudo apt-get upgrade
สิ่งที่ต้องทำต่อไปคือลง library ที่ช่วยในการจัดการ ir ชื่อ Linux Infrared Remote Control (LIRC)
$ sudo apt-get install lircupdate 2018–04–02 สำหรับ raspbian รุ่นใหม่ (ใหม่กว่า raspbian-02–05)ต้องแก้ config ใน module ด้วย โดยทำการสร้างไฟล์สำหรับ lircd ใน /etc/module ได้เป็นไฟล์ /etc/modprobe.d/ir-remote.conf ใส่ config เป็น
lirc_dev
lirc_rpi gpio_in_pin=18 gpio_out_pin=17
จากนั้นใส่ค่านี้ใน /boot/config.txt เพื่อให้เรียกใช้งาน lirc ตอน boot ขึ้นมา โดยใส่ในบรรทัดล่างสุดเลย
dtoverlay=lirc-rpiหรือถ้าจะกำหนดขาของ GPIO ด้วยว่าให้รับส่งข้อมูลขาไหนบ้าง ก็ใส่เป็น
dtoverlay=lirc-rpi,gpio_in_pin=18,gpio_out_pin=17Overlays are loaded using the “dtoverlay” directive. As an example, considerthe popular lirc-rpi module, the Linux Infrared Remote Control driver. In thepre-DT world this would be loaded from /etc/modules, with an explicit”modprobe lirc-rpi” command, or programmatically by lircd. With DT enabled,this becomes a line in config.txt:
dtoverlay=lirc-rpi
This causes the file /boot/overlays/lirc-rpi.dtbo to be loaded. Bydefault it will use GPIOs 17 (out) and 18 (in), but this can be modified usingDT parameters:
dtoverlay=lirc-rpi,gpio_out_pin=17,gpio_in_pin=13
Parameters always have default values, although in some cases (e.g. “w1-gpio”)it is necessary to provided multiple overlays in order to get the desiredbehaviour. See the list of overlays below for a description of the parametersand their defaults.
(https://github.com/raspberrypi/firmware/blob/master/boot/overlays/README)
reboot หนึ่งครั้ง เพื่อดูว่าตัว boot config ที่เราได้ตั้งค่าไป ทำการ start lirc_rpi ขึ้นมาให้หรือเปล่า
$ sudo rebootจากนั้นเช็คว่า module lirc_rpi ถูกโหลดขึ้นมาไหม ถ้ารันแล้วได้ผลลัพธ์คล้ายๆด้านล่างแปลว่าโหลดมาแล้ว แต่ถ้าไม่มีอะไรแสดงเลย แปลว่าไม่สำเร็จ อาจจะทำผิดพลาดอะไรบางอย่าง
$ sudo lsmod | grep lirc_rpi
lirc_rpi                6478  0
lirc_dev                8310  1 lirc_rpi
ลองเช็คใน dmesg ดูว่า driver ถูก register แล้วหรือยัง
$ sudo dmesg | grep lirc_rpi
[ 4.912071] lirc_rpi: auto-detected active low receiver on GPIO pin 18
[ 4.912490] lirc_rpi lirc_rpi: lirc_dev: driver lirc_rpi registered at minor = 0
[ 4.912495] lirc_rpi: driver registered!
เช็คว่า linux สร้าง IR device ให้เราเรียบร้อยแล้ว
$ sudo ls -l /dev/lirc*
crw-rw — — 1 root video 244, 0 Dec 10 19:25 /dev/lirc0
ตรงนีจะเห็นว่ามี device อันเดียว คือ **/dev/lirc0 **เราต้องใช้ชื่อ device นี้ในการเรียกตัว ir ที่เราติดตั้งไป
ถ้าหากผลลัพธ์จากการตรวจสอบไม่พบอุปกรณ์ หรือว่ามีความผิดพลาดเกิดขึ้น อาจจะเกิดได้จากหลานสาเหตุเช่น อุปกรณ์ผิดพลาด ลงโปรแรกมผิด หรือไม่สามารถ register ได้ ทำให้ใช้งานไม่ได้
Testing the IR Sensor on the Rasberry Pi
ทดสอบการรับสัญญาณ ด้วยคำสั่ง mode2 ที่ติดตั้งมาพร้อมกับ lirc โดยการเรียก mode2 ตามด้วย -d แล้วตามด้วยชื่อ device ที่เราได้จากด้านบน เช่น
$ mode2 -d /dev/lirc0เพื่อทำการเปิดใช้ดักจับค่าที่ sensor ได้รับแล้วแสดงผล เช่น ผลลัพธ์จากการกดเพิ่มอุณภูมิของ air 1 ครั้ง
space 16777215
pulse 9200
space 4450
pulse 613
space 478
pulse 610
space 1589
pulse 585
space 1589
pulse 611
space 477
pulse 609
space 1591
pulse 583
space 504
pulse 583
space 504
pulse 612
space 502
pulse 581
space 480
pulse 609
space 1564
pulse 612
space 502
pulse 609
space 479
pulse 583
space 1591
pulse 610
space 476
pulse 610
space 1564
pulse 612
space 1589
pulse 610
space 477
pulse 610
space 477
pulse 610
space 477
pulse 610
space 478
pulse 610
space 502
pulse 592
space 496
pulse 584
space 504
pulse 583
space 529
pulse 595
space 466
pulse 610
space 477
pulse 609
space 478
pulse 611
space 502
pulse 584
space 503
pulse 585
space 503
pulse 560
space 526
pulse 612
space 502
pulse 585
space 475
pulse 611
space 477
pulse 609
space 505
pulse 584
space 502
pulse 582
space 511
pulse 578
space 502
pulse 614
space 474
pulse 611
space 503
pulse 583
space 477
pulse 610
space 504
pulse 583
space 1590
pulse 610
space 477
pulse 610
space 478
pulse 607
space 1566
pulse 612
space 474
pulse 613
space 1616
pulse 584
space 476
pulse 611
space 477
pulse 609
space 477
pulse 611
space 477
pulse 610
space 477
pulse 609
space 1590
pulse 585
space 1589
pulse 612
space 1590
pulse 583
space 477
pulse 610
space 478
pulse 609
space 503
pulse 609
space 479
pulse 610
space 477
pulse 584
space 1589
pulse 612
space 475
pulse 611
space 503
pulse 505
ยาวมาก ลองอีกอัน กดเปิดทีวี
space 16777215
pulse 4542
space 4478
pulse 581
space 1663
pulse 580
space 1661
pulse 582
space 1662
pulse 577
space 543
pulse 580
space 541
pulse 584
space 543
pulse 575
space 540
pulse 580
space 543
pulse 578
space 1663
pulse 578
space 1663
pulse 579
space 1663
pulse 580
space 541
pulse 580
space 541
pulse 580
space 542
pulse 580
space 540
pulse 580
space 542
pulse 579
space 542
pulse 579
space 1661
pulse 582
space 541
pulse 580
space 541
pulse 578
space 542
pulse 579
space 546
pulse 578
space 539
pulse 580
space 543
pulse 578
space 1662
pulse 581
space 545
pulse 576
space 1661
pulse 580
space 1667
pulse 577
space 1660
pulse 578
space 1663
pulse 580
space 1663
pulse 578
space 1662
pulse 581
ถึงตรงนี้ ถ้ากดรีโมทแล้วไม่มีอะไรขึ้นมา น่าจะแปลว่าต่อวงจรผิดนะครับ อาจจะเสียบสายผิด หรือ sensor เสีย หรือเปิด lirc ไม่ติด
Create remote config
ต่อไปคือเริ่มขั้นตอนการ record remote ที่เราต้องการ เริ่มต้นด้วยดูก่อนว่า มี key อะไรบ้างที่เรากำหนดค่าได้ ด้วยคำสั่ง
$ irrecord —l
KEY_0
KEY_102ND
KEY_1
KEY_2
KEY_3
KEY_4
KEY_5
KEY_6
KEY_7
KEY_8
...
ส่วนนี้คือรายชื่อของ key ทั้งหมดที่เรากำหนดได้ ซึ่งจะใช้ในขั้นตอนถัดไป
ต่อมารันคำสั่งเพื่อทำการ เรียนรู้ key remote
$ irrecord -d /dev/lirc0 <ชื่อไฟล์ config>.confเช่นกำลังจะ record remote แอร์ห้องนอน ของ trane ผมเลยใช้
$ irrecord -d /dev/lirc0 bedroom_ac_trane.confพอรันคำสั่งก็มีข้อความอธิบายขั้นตอนการทำงานว่าเราจะต้องทำอะไรบ้าง
irrecord — application for recording IR-codes for usage with lircCopyright © 1998,1999 Christoph Bartelmus(lirc@bartelmus.de)This program will record the signals from your remote control
and create a config file for lircd.A proper config file for lircd is maybe the most vital part of this
package, so you should invest some time to create a working config
file. Although I put a good deal of effort in this program it is often
not possible to automatically recognize all features of a remote
control. Often short-comings of the receiver hardware make it nearly
impossible. If you have problems to create a config file READ THE
DOCUMENTATION of this package, especially section “Adding new remote
controls” for how to get help.If there already is a remote control of the same brand available at
http://www.lirc.org/remotes/ you might also want to try using such a
remote as a template. The config files already contain all
parameters of the protocol used by remotes of a certain brand and
knowing these parameters makes the job of this program much
easier. There are also template files for the most common protocols
available in the remotes/generic/ directory of the source
distribution of this package. You can use a template files by
providing the path of the file as command line parameter.Please send the finished config files to <lirc@bartelmus.de> so that I
can make them available to others. Don’t forget to put all information
that you can get about the remote control in the header of the file.Press RETURN to continue.กด enter หนึ่งที
Now start pressing buttons on your remote control.It is very important that you press many different buttons and hold them
down for approximately one second. Each button should generate at least one
dot but in no case more than ten dots of output.
Don’t stop pressing buttons until two lines of dots (2x80) have been
generated.Press RETURN now to start recording.ตรงนี้ก็จะบอกว่า จะเริ่มจริงๆแล้วนะ ให้กดปุ่มสุ่มๆใน remote กดแช่ซัก 1 วิ เมื่อกดแล้ว จะมี จุด เกิดขึ้นอย่างน้อย 1 จุดแต่ไม่ควรเกิน 10 จุด คือ 1 จุดแทนด้วย 1 ชุดข้อมูลที่ตัวรับสัญญาณได้รับ รีโมทบางตัวอาจจะกดครั้งเดียวแต่ส่งข้อมูลออกมาหลายชุด แต่ว่าถ้ากดแช่แล้วจุดโผล่มาเยอะๆอาจจะเป็นไปได้ว่าเป็นรีโมทที่ส่งข้อมูลเดิมๆซ้ำๆออกมา เหมือนพวกรีโมทรถบังคับ ที่จะส่งคำสั่งเดิมไปเรื่อย จนกว่าจะปล่อย ซึ่งแบบนี้จะใช้ไม่ได้ จริงๆก็ได้นะ แต่กดแป๊ปเดียวแล้วปล่อยก็พอ
ถ้าพร้อมแล้วก็ให้กด enter จากนั้นก็กดบนรีโมทปุ่มสุ่มๆ ไปเรื่อยๆ ทุกครั้งที่กด ก็จะมี จุด เพิ่มขึ้นมา กดจนกระทั่ง จุด มันเพิ่มขึ้นมามากกว่า 80 จุด (เต็มบรรทัด) ก็จะเจอข้อความ
Now start pressing buttons on your remote control.It is very important that you press many different buttons and hold them
down for approximately one second. Each button should generate at least one
dot but in no case more than ten dots of output.
Don’t stop pressing buttons until two lines of dots (2x80) have been
generated.Press RETURN now to start recording.
……………………………………………………………………..
Found gap: 19941
Please keep on pressing buttons like described above.ก็ให้กดปุ่มต่อไปอีกรอบ ได้ จุดเพิ่มมาอีก 1 แถว
พอระบบเรียนรู้จนพอใจแล้ว ก็จะแสดงผลลัพธ์ออกมาว่าเรียนรู้สำเร็จแล้ว เดาว่าน่าจะ config ประมาณนี้แหละ สำหรับ remote รุ่นนี้
Please keep on pressing buttons like described above.
……………………………………………………………………..
Suspicious data length: 65.
No header found.
Found trail pulse: 676
No repeat code found.
Signals are space encoded.
Signal length is 32
Now enter the names for the buttons.
ต่อไปโปรแกรมก็จะให้เรากำหนดชื่อให้กับแต่ละปุ่ม โดยการใส่ชื่อของปุ่มนี้ลงไป
Please enter the name for the next button (press <ENTER> to finish recording)ซึ่งชื่อตรงนี้จะต้องใส่ตามชื่อที่มีให้ ตอนเรารันคำสั่ง “irrecord — list-namespace” ตามที่เขียนไว้ด้านบนเท่านั้น
ยกตัวอย่าง remote แอร์ ของแอร์เนี่ยจะท่ายากกว่า remote ทั่วไปหน่อยตรงที่ ปุ่มเปิดกับปุ่มปิด มันปุ่มเดียวกัน และถ้าตั้งค่าต่างกัน ก็จะส่งค่าไม่ได้เหมือนกัน ทั้งๆที่กดปุ่มเดียวกัน เช่น ถ้าตั้งอุณหภูมิไว้ 27 องศา พัดลม swing กดปุ่มครั้งแรก จะเป็นเปิดและตั้งค่า 27c swing fan แต่กดอีกที จะเป็น ปิดพัดลม หรือถ้าเราตั้งค่าเป็นค่าอื่น กดเปิด ก็จะส่งค่าอื่นไป เพราะงั้นตอนบันทึกค่าของ remote แอร์ ต้องคำนึงถึงเรื่องนี้ด้วย ตอนจะตั้งค่าให้ปุ่ม (ผมใช้วิธีกดเปิด แล้วเอามือบังไว้ แล้วกดปิด แล้วกดเปิดส่งสัญญาณไปอีกที จะได้ส่งค่าเดียวกันทุกครั้ง)
พอของแอร์เป็นแบบนี้ ผมเลยบันทึกสัญญาณไว้แค่ 3แบบคือ
- กดปุ่มเปิดแอร์ 27c (ใส่ KEY_PROG1)
- กดปุ่มเปิดแอร์ 25c (ใส่ KEY_PROG2)
- กดปุ่มปิดแอร์ (ใส่ KEY_CLOSE)
ทั้ง 3 อันบันทึกได้จากกดปุ่มเปิดปุ่มเดียว แต่ว่าบันทึก pattern ที่ต่างกัน
ก็เริ่มจากปุ่มแรก KEY_PROG1 โดยตั้งค่า remote ว่าเป็น เปิดแอร์ 27c ก็ใส่ชื่อ KEY_PROG1 จากนั้นกด enter โปรแกรมก็จะบอกให้เรากดปุ่ม ที่ต้องการแช่ไว้
ถ้าเป็นรีโมทธรรมดา เช่นรีโมททีวี จะกดค้างไว้ได้เลย แต่เนื่องจาก แอร์ การกดค้างไว้ ไม่ได้ส่งคำสั่งซ้ำ ก็เลยต้องกด 1 ครั้งเพื่อเปิดและตั้งแอร์ 27c จากนั้นเอามือบัง ir ของแอร์ไว้ แล้วกดปิด เสร็จแล้วเอามือออก แล้วกดเปิดอีกครั้ง เพื่อส่งคำสั่งเดิม ทำไปเรื่อยๆ ถ้าระบบบันทึกเสร็จแล้ว มันก็ขึ้นถามอีกครั้งว่าต่อไปจะบันทึกปุ่มไหน
Please enter the name for the next button (press <ENTER> to finish recording)
KEY_PROG1
Now hold down button "KEY_PROG1".Please enter the name for the next button (press <ENTER> to finish recording)ก็บันทึกทุกปุ่มจนเสร็จเรียบร้อยแล้ว ถ้าจะไม่บันทึกต่อก็กด enter ได้เลย
จากนั้นจะได้ไฟล์มาหนึ่งไฟล์ตามชื่อที่เราระบุไว้ เช่น bedroom_ac.conf ซึ่งรายละเอียดในไฟล์จะเป็นประมาณนี้
begin remote name bedroom_ac.conf
bits 8
flags SPACE_ENC
eps 30
aeps 100 one 676 1631
zero 676 530
ptrail 676
pre_data_bits 24
pre_data 0x800400
gap 19941
toggle_bit_mask 0x0 begin codes
KEY_PROG1 0x00
KEY_CLOSE 0x01
KEY_PROG2 0x0B
end codesend remoteรายละเอียดแต่ละบรรทัดเกี่ยวกับอะไรบ้างขอไม่พูดถึงละกันนะครับ ใครสนใจอยากรู้ว่ามันคืออะไรบ้างไปอ่านเพิ่มได้ใน http://www.lirc.org/html/lircd.conf.html
ส่วนที่เราต้องสนใจคือ
name bedroom_ac.confตรงนี้จะเป็นชื่อ remote ที่เราต้องใช้ในการเรียกในอนาคต เพราะงั้นเปลี่ยนให้จำง่าย และมีแต่ตัวหนังสือจะดีกว่า เช่น
name bedroom_acอีกส่วนคือดูว่ามีปุ่มอะไรให้ใช้บ้าง ก็จะมี list ตามที่เราได้บันทึกไป
  begin codes
     KEY_PROG1 0x00
     KEY_CLOSE 0x01
     KEY_PROG2 0x0B
end codesส่วนนี้ถ้ากลัวลืมสามารถใส่ comment ได้ด้วยเครื่องหมาย # เช่น
begin codes
     KEY_PROG1 0x00 # Open  ac at temp 27c fan auto
     KEY_CLOSE 0x01 # Close ac
     KEY_PROG2 0x0B # Open auto mode 25c
end codes
Load remote config
ก่อนที่จะทำการทำให้ lirc ส่งสัญญาณของ remote เรา จำเป็นที่จะต้องมีการ config ค่าพื้นฐานต่างๆของ lirc ให้ทำงานได้อย่างถูกต้องการ
เริ่มจาก กำหนด driver และ device ที่จะใช้งาน โดยแก้ไขไฟล์ /etc/lirc/hardware.conf จาก
# Run “lircd — driver=help” for a list of supported drivers.
DRIVER="UNCONFIGURED"
# usually /dev/lirc0 is the correct setting for systems using udev
DEVICE=""
MODULES=""
เป็น
# Run “lircd — driver=help” for a list of supported drivers.
DRIVER="default"
# usually /dev/lirc0 is the correct setting for systems using udev
DEVICE="/dev/lirc0"
MODULES="lirc_rpi"
ใส่ file remote ของเราเมื่อกี้ลงไปใน /etc/lirc/lircd.conf ด้วยเพื่อให้ lirc รู้จักกับ config ของเรา
include "/app/ac_trane_remote_ir/bedroom_ac.conf"อย่าลืมเช็คด้วยนะครับ ว่าต้องลบพวกบรรทัดที่เป็น # ออก โดยเฉพาะบรรทัดแรกที่เขียนว่า #UNCONFIGURE เพราะจะทำให้มันไม่อ่าน config เรา
แล้ว restart lirc เพื่อให้ load config ใหม่เข้าไป
$ sudo service lirc restartลองเช็คว่ามันโหลดและทำงานได้ปกติไหม
$ sudo service lirc status
â — lirc.service — LSB: Starts LIRC daemon.
Loaded: loaded (/etc/init.d/lirc)
Active: active (running) since Mon 2016–12–12 06:05:50 UTC; 2s ago
Process: 1208 ExecStop=/etc/init.d/lirc stop (code=exited, status=0/SUCCESS)
Process: 1218 ExecStart=/etc/init.d/lirc start (code=exited, status=0/SUCCESS)
CGroup: /system.slice/lirc.service
└─1227 /usr/sbin/lircd — driver=default — device=/dev/lirc0Dec 12 06:05:50 raspberrypi lirc[1218]: Loading LIRC modules:.
Dec 12 06:05:50 raspberrypi lircd-0.9.0-pre1[1227]: lircd(default) ready, using /var/run/lir…cd
Dec 12 06:05:50 raspberrypi lirc[1218]: Starting remote control daemon(s) : LIRC :.
Dec 12 06:05:50 raspberrypi systemd[1]: Started LSB: Starts LIRC daemon..
Hint: Some lines were ellipsized, use -l to show in full.เท่านี้เราก็สามารถทดลองส่ง สัญญาณ infrared กันได้เลย
Sending IR signal
วงจรการต่อ ถ้าไม่ได้ใช้ แบบสำเร็จรูป ก็จะต้องต่อวงจรตามด้านล่าง
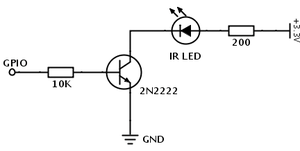
http://www.raspberry-pi-geek.com/Archive/2015/10/Raspberry-Pi-IR-remote
หรือถ้าใช้แบบสำเร็จรูป ก็เอา ขา Data ต่อกับ GPIO 17 (หรือ port อื่นตามที่ตั้งค่าไว้)
ลองเช็คว่า remote ของเราถูก load มาหรือยัง
$ irsend LIST "" ""
irsend: bedroom_ac
ถ้าไม่มีค่าอะไรอยู่เลย อาจจะมีการ config ผิด ให้ลองเช็คดูในหัวข้อ create remote config
ลองดูว่า remote ของเราส่งคำสั่งอะไรได้บ้าง
$ irsend LIST bedroom_ac ""
irsend: 0000000000000000 KEY_PROG1
irsend: 0000000000000001 KEY_CLOSE
irsend: 000000000000000b KEY_PROG2
ต่อไปลองส่งคำสั่งดู ว่าสามารถส่งคำสั่งไปยังอุปกรณ์ได้หรือไม่ เช่น สั่งเปิดแอร์
$ irsend SEND_ONCE bedroom_ac KEY_PROG1เย่ แอร์ก็จะติดขึ้นมา (บางครั้งเป็นไปได้ว่า ir led ของเราไม่ค่อยแรง หรืออาจจะหันหน้าไม่ตรง ให้ลองปรับๆองศา ของ ir led ให้หัวมนๆชี้ไปทางตัวรับสัญญาณของเครื่องรับแล้วลองรันใหม่ดู)
ถ้า Remote ที่ record ไว้ ไม่เวิร์คทำอย่างไร
เป็นไปได้เหมือนกันที่การ learning จะล้มเหลว ทำให้ข้อมูลที่ส่งไปไม่สามารถสั่งงานอุปกรณ์ได้ ในกรณี้นี้ เราสามารถ ใช้ raw signal ในการส่งสัญญาณเลยก็ได้ไม่จำเป็นต้องไปเข้ารหัสก่อน
โดอยวิธีการคือ อันดับแรกเราทำการ บันทึกสัญญาณที่เราต้องการจะบันทึกก่อน เช่น กดปุ่มเปิดแอร์ที่เราได้ทำไป ด้วยคำสั่ง mode2 แต่คราวนี้ใส่ -m ต่อท้ายด้วย เพื่อให้พิมพ์ออกมาแต่ตัวเลข ไม่ต้องพิมพ์ raw mode เหมือนตัวอย่างด้านบน จะได้ผลลัพธ์ประมาณนี้
$ mode2 -d /dev/lirc0 -m
  4886267
9178 4447 638 476 584 1589
611 1590 585 502 583 1592
608 481 609 475 612 512
574 483 605 1589 611 477
611 479 607 1564 611 1590
584 503 612 510 577 474
612 476 608 506 585 501
585 503 582 504 613 475
611 502 585 478 609 503
584 503 580 507 585 501
611 481 607 476 610 504
584 476 611 502 585 503
584 502 611 476 612 476
612 475 611 502 584 503
587 500 587 501 584 1589
612 476 613 509 574 505
585 1615 584 477 610 477
611 476 612 479 607 502
585 1589 585 1589 585 1616
585 476 637 477 610 477
611 476 615 1560 612 475
609 505 610 476 532ตัวเลขตัวแรกที่ค่าเยอะๆ เป็นค่าความยาวคลื่นที่รับมา เราไม่ต้องสนใจ แต่เราสนใจบรรทัดต่อมา ตั้งแต่ 9178 จะถึงบรรทัดสุดท้าย ส่วนนี้คือค่าสัญญาณ remote ของเราในการส่งคำสั่งนั้น
เช่นจากตัวอย่างเรื่องแอร์เมื่อกี้ ถ้าบันทึกแบบ raw จะได้เป็น
$ cat bedroom_ac_raw.confbegin remote name bedroom_ac_raw
flags RAW_CODES
eps 30
aeps 100
gap 30000 begin raw_codes name KEY_PROG1
9042 4453 682 1627 681 525
685 522 682 1626 683 523
681 528 678 1628 682 525
680 1626 682 1626 656 550
682 1626 682 525 680 526
681 526 654 552 655 551
680 526 683 524 680 526
681 525 683 1627 680 1627
655 1653 681 525 654 553
680 526 684 524 680 1627
683 522 682 1627 680 526
683 529 649 1654 681 525
681 19937 704 1626 682 525
682 525 681 525 681 525
681 527 680 526 655 551
653 553 655 554 680 1626
680 528 679 527 656 1651
655 552 680 525 681 525
680 528 654 551 682 525
679 527 683 523 680 526
681 526 654 552 655 551
681 526 683 524 680 527
677 528 680 525 654 553
654 199425
6055 2963 681 1626 681 1628
655 1652 682 1627 679 1628
654 553 682 525 653 553
653 1655 653 553 681 1627
681 526 680 526 681 1626
682 525 681 1627 679 name KEY_CLOSE
9040 4460 682 1625 682 525
683 523 679 527 682 525
680 527 680 1627 681 527
681 1626 682 1626 682 525
681 1629 651 553 680 526
682 524 654 553 678 529
680 525 682 525 683 523
687 524 676 1631 679 525
681 1627 680 525 682 525
653 553 683 524 680 1627
683 523 686 1623 682 525
681 525 680 1627 681 526
681 19934 706 1626 681 525
685 522 680 526 681 525
691 516 681 525 680 527
683 523 680 526 681 526
680 526 680 525 684 1624
682 530 678 524 682 524
681 526 681 525 681 525
682 525 680 526 681 525
681 525 682 524 682 524
681 526 681 525 682 525
680 526 680 525 683 1626
682 end raw_codesend remoteจะเห็นว่าตรงส่วนของ flags เราเปลี่ยนเป็น RAW_CODES และส่วนของค่าต่างๆ เราใส่เป็น raw ที่ได้จาก mode2 ได้เลย เวลาทำงานจะเป็นการส่งค่า ที่อ่านได้นี้ไปยัง remote โดยตรง